As part of the restoration of my $300 TJ Wrangler Craigslist buy, I was replacing the interior with the newer interior from a 2005 Rubicon model I purchased, swapped and traded parts for. After doing some paint and bed liner spray-in treatment to the floor pans and interior with Kevlar embedded polyurethane liner, it was finally time to install the 05 Rubicon interior. As one of the bonus upgrades, I happened across a 2002 dark agate or "slate" full console to upgrade the half console my $300 TJ came with originally. This had the subwoofer and amplifier inside the console but the subwoofer surround was completely rotted away and the dust screen was rattling loose against the speaker cone.
After reading many different posts on the various forums all over the web, I choose to follow a slightly different path and use the newly released Stillwater Designs "Kicker" brand 43CWRT672 mini sub. This sub fits the bill perfectly since it is almost an exact fit size and dimensions plus it uses the "DVC" Dual Voice Coils technology if you wish to re-use the factory amplifier. After talking with the good people from Crutchfield where I bought the Kicker subwoofer, we both agreed the factory amplifier would not be up to the task of powering a premium quality speaker rated at 300W (150W per voice coil) as the factory amplifier only makes about 40W x 2 per output from a very small device. Bottom line, I would not be happy... Here are some pictures.
Remove the console by lifting out the front rubber cup holder and rear cup holder liner. Remove the bolts that hold the console to the tub floor. You may have to remove the shift boot or automatic shifter and loosen the front half of the console to lift out the back half. Unplug the amplifier connector located under the front cup holders. Depending on year, this will be a 6 or 12 pin connector usually grey in color and remove the console. The connector changes; 2001-2002 early connector, 2003-2006 later 12 pin.
Turn the console upside down and remove these speed clips that hold the brackets to the bottom of the cup holders (pointing to with a screwdriver).
There are 3 screws around the speaker grill that must be removed and two more inside the lid of the console. Removing these 5 screws and the two speed clips will allow you to separate the subwoofer & amplifier module from the console so they can be worked on.
What you will notice about this subwoofer when you have the enclosure removed from the console is the wires run in a channel from under the edge of the speaker on the front of the box. There is a rubber glue that is used to secure the original speaker and seal the enclosure so that it is air tight. This is important that there are no air leaks when you re-install the new speaker because it may cause sound effects in your music at certain frequencies. The Kicker is designed to be used in a small sealed box so we want to make sure the foam that pinches the wiring is in good shape and the foam on the back side of the new speaker makes a good air tight seal.
The new speaker has a larger magnet and basket structure so you will need to "dremel" out some of the ribbing in the inside of the enclosure. Sorry I forgot to take a picture of trimming the ribs inside the box for the new sub to fit. You will need to trim a little bit more on the bottom side of the enclosure as the subwoofer sits at a very slight angle in the box and is tilted downward. Trim a little then test fit is how I did it and it only took about 15 minutes with a cutoff wheel and careful depth measurement with a ruler.
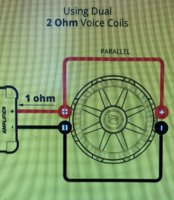
If you are choosing to re-use your factory amplifier built into the back passenger side of the enclosure, please understand it will not be able to drive the Kicker 43CWRT672 to it's full potential performance. The Kicker sub has the same 2 Ohm rating per voice coil as the factory sub, however to fully drive it will require a different amplifier. The factory amplifier as I mentioned earlier is only rated for about 40 watts per channel output. I chose to use a Kicker 42PXA300.4 300 Watt 4 channel amplifier to power the sub. This amplifier is designed for motorsports and off-road or boating and is very very small. I will post pictures of this amplifier soon. Don't let the size of this tiny powerhouse fool you, it puts out! The amplifier will produce 75 Watts per channel, almost 2 times the total factory Jeep amplifier at 2 Ohms on 2 channels and I will have 2 more outputs for some 6x9" 3-way speakers in wakeboard tower cans on my back roll bar. Lots of tunes for a very small footprint amp that will be hidden high up in the dash to avoid water and mud. Id rather not test it's "waterproof & mud-proof" rating when crossing Fordyce creek next summer!
The picture of the factory amplifier heat sink. I gutted the amplifier and left the heatsink to seal a large hole that would otherwise be in the back of the enclosure since this is supposed to be a SEALED ENCLOSURE BOX. The picture of the gold screws is to sealing up the two screw holes that were where the heatsink mounted to the spacer that conducted the heat from the amplifier circuit semiconductor. One of the pictures shows the small amplifier circuit encapsulated in glue and plastic that powered the factory subwoofer (black plastic horse shoe looking thing on top of a newspaper add).
Please note: your rear speaker wiring is connected through this amplifier so if you want to bypass it without affecting your sound bar speakers or pods, you can tape or heat shrink the connectors that went to the original sub speaker. Leave all your wiring in tact and just add four more speaker wires from your new sub spring terminals to your aftermarket amplifier. Make sure the original terminals cannot short or touch anything or short out as they will still have power to them. Carefully route your newly added wires through the same area using care to make sure the gasket behind the speaker edge will still seal well. Add silicone if you believe it won't seal well.
Screw down your speaker directly into the plastic housing making sure it fully seats all the way around the back side of the frame. The speaker will sit slightly offset LOW in the opening because there is a relief in the top of the housing that will force the speaker not to sit perfectly centered because of the CD holder in the arm rest compartment. This is OK and will not affect performance of the subwoofer if you make sure the ribs were trimmed and the speaker can fit flush with it's opening relief. It is a tight fit and I angled the speaker in carefully to watch the wiring terminals and routing. Take your time to get it right, it will fit snug and require all 8 screws to secure the speaker in place. I used 1" drywall screws as this is the automotive industry standard for subwoofer boxes and the heads fit perfectly in the speaker basket. Start by screwing in the bottom screws then work opposite to the top and sides careful the basket remains flush and sits flat and your wiring doesn't get disturbed coming out from under the left side of the speaker. ( Seems wordy but when you mount yours, it will make perfect sense and you'll SEE what I'm referring to.
It is IMPORTANT that you DO NOT OVER TIGHTEN THE SCREWS as they are only going into plastic and can strip out easily. I repeat, careful not to over tighten the speaker mounting screws. There are 8 of them and they will hold the speaker in just fine by themselves.
A few more pictures including the final product: Notice the Kicker logo peaking from behind the grill of the console.
On a final note, when re-assembling the console, assemble in reverse order. If you were careful when removing the speed nuts that secure the outer console to the subwoofer module brackets, you should be able to re-use them, they will keep the brackets and console lined up when re-installing the console in your Jeep. Re attach the subwoofer 6 or 12 pin plug to the OEM amplifier unless you have removed the original amplifier as I have and re-wired your rear sound bar or pods to bypass the factory amplifier. Install all removed screws and don't forget to replace the rear cup liner when you've finished the job. Nobody should realize you've just added high performance audio parts since they are not visible and fit where factory equipment was mounted to help avoid theft of your new sound system. Don't forget to switch in the low-pass crossover for your subwoofer and adjust the bass gain to balance out your system if you've installed an aftermarket amplifier to drive your new Kicker subwoofer. I will have more on installing and adjusting aftermarket amplifiers in another edition of "How To:"! Thanks for reading and feel free to contact me if anyone would like help on this or any other topics I post about in the future.
RangerRick
Last edited: